Create virtual backgrounds to add value and control the narrative of your video conferences and live streams.
A crucial part of the live video experience, whether it’s an online meeting or broadcast, is the presenter’s backdrop. A busy background can be distracting and take the focus away from the subject. The secret to a background that adds value to your live videos is you need to have total control over it. That’s why virtual backgrounds are more popular than ever, and in this blog post, you’ll find out how to create virtual backgrounds that fit your needs perfectly!
Want to enhance your video conferences? Download ManyCam for free today!
Note: To activate the Virtual Backgrounds feature on ManyCam, users need a Studio, Premium or Enterprise subscription.
Virtual backgrounds on video conferences & live streams
Over the last few months, virtual backgrounds became an influential part of video conferences and live streams. Due to the quarantine, many professionals saw themselves having to attend online meetings from home without that ideal “bookshelf” background. Content creators also encountered issues when making videos that required specific backdrops.
The solution: virtual backgrounds. The fastest way for users to control what happens (or doesn’t happen) behind them on camera.
The “fake” backgrounds quickly gained a lot of traction, and software applications like ManyCam made it easy for users to change their background with the flip of a switch. Though some people resorted to the green screen effect (Chroma Key), most didn’t want to invest extra on a green backdrop to create that setup, so virtual backgrounds were the way to go.
There are many advantages to using virtual backgrounds over real backdrops, such as:
- Quickly cover messy backgrounds
- Set up your background in advance to increase productivity
- Help attendees and viewers focus on the content of your video
- Make your backdrop look professional
- It’s a great branding opportunity, especially on live broadcasts
- Use your virtual background to reinforce your message or content
The key to using virtual backgrounds on your meetings and broadcasts is to learn how to create your own backgrounds so that you have full control over your video.
How to create virtual backgrounds
When you use the Virtual Backgrounds feature on ManyCam, you’ll find some default background options that you can use on your live videos. The options available are high-quality images ranging from beach scenes and classrooms to offices, famous city landmarks, and more.
You can select any of the images available, and it will be set as your background. But, adding your own pictures can be just as easy. Instead of choosing among the options available, you can click on the last option: Custom Background.
Then, you can find images on your computer and select them as your virtual background. Any jpg or png file should work. The secret to creating perfect virtual backgrounds is to make sure the image has enough quality and the right aspect ratio.
Aspect ratio
The aspect ratio of your virtual background should match the one you have set up on ManyCam. This is the ratio of the width to the height of images and screens. The most common aspect ratio for video conferences, broadcasts, and videos, in general, is 16:9, not taking the mobile’s vertical orientation into account.
If on ManyCam, you set up your resolution to 1080p, which is Full HD, your screen aspect ratio will be 16:9, and so should your virtual backgrounds be.
Some webcams and apps might have a default ratio of 3:4 (960p, 1200p, 1440p). Even though the 16:9 backgrounds might still work, ManyCam will have to resize them slightly, and you might lose some quality. Ideally, when you create your background, you should create it with the aspect ratio in mind.
When in doubt, go for a high-quality JPEG with 1920x1080px.
Stock images as your virtual background
A quick way to create virtual backgrounds for your live videos is to look for stock images that relate to your company or content. Stock image libraries have grown a lot over the last few years, and many have thousands of options available covering a wide range of topics.
Paid libraries: Shutterstock & others
One of the most popular ones is Shutterstock, which offers a free trial with 10 images to get users started. After that, you will need a paid subscription to download other images. The best things about Shutterstock are its vast galleries and the filters available. Plus, you can also edit pictures with Shutterstock tools.
Other well-known stock photo galleries are iStockPhoto, Adobe Stock, and DepositPhotos.
Free stock images
Many websites built libraries of stock images for free, and they can come in handy when you are creating your virtual backgrounds, such as:
When looking for images, keep the aspect ratio in mind and aim for 1920x1080px images. If you find the perfect virtual background in the wrong size, you can also get an image editor and just crop it to the right dimension.
Create custom virtual backgrounds
If your goal is to create unique virtual backgrounds that enhance your production value, reinforce your message, or simply relate to your brand, you will need more than stock photos. Luckily, web-based apps allow users to create designs with any dimension and export them as jpeg, png, and so on.
Below, we listed a couple of options that we have tried and worked well to create virtual backgrounds. But, keep in mind, there are tons of options out there.
Canva
A web-based graphic design app with tons of templates that makes creating your virtual backgrounds easy. On Canva, you can select among tons of templates, which will definitely help your productivity. Then, you can upload your own images to your design.
Here is a step-by-step to create your first virtual background on Canva:
- After you create a free account, click on Create a Design on the top-right corner to get started and choose Custom Dimensions (1920x1080px).
- Next, look through some of the many templates available and choose one that you’d love to have as your virtual background.
- On the template itself, you can resize graphics, change texts, and customize it any way you want.
- Then, click on Upload to add your logo or any other images.
- Resize and drag the logo to its place
- Click on Download and get your png virtual background ready for your next live video.
Extra tip: When choosing templates, if you type “Virtual background” in the search box, Canva already has a ton of options available!
Crello
Very similar to Canva, Crello also offers web-based design tools and templates for their free users that can help you create virtual backgrounds in a few minutes. Since the usability of this app is very close to Canva, you can follow the same steps to create your background.
Outsource design
Another alternative when creating your virtual backgrounds is to consider outsourcing the design. This is a more expensive option, but it might save you time in the long run.
Virtual Backgrounds on ManyCam – Step-by-step
- Add your webcam as your primary video source by right-clicking on the Live Window and selecting your webcam among the options.
- Find the Virtual Backgrounds tab on the right-side vertical toolbar and click to access it.
- Flip the Virtual Backgrounds switch.
- Choose “Replace”
- Click on the dropdown menu for your Background image and select Custom Background.
- Pick the background you created.
And that’s it. Your custom background will be placed behind you, and you’ll be ready for your meetings and broadcasts.
Learn how to connect ManyCam to any video conferencing app.
Note: The Virtual Backgrounds feature is available for Studio, Premium, and Enterprise subscribers.
Use videos as your virtual background
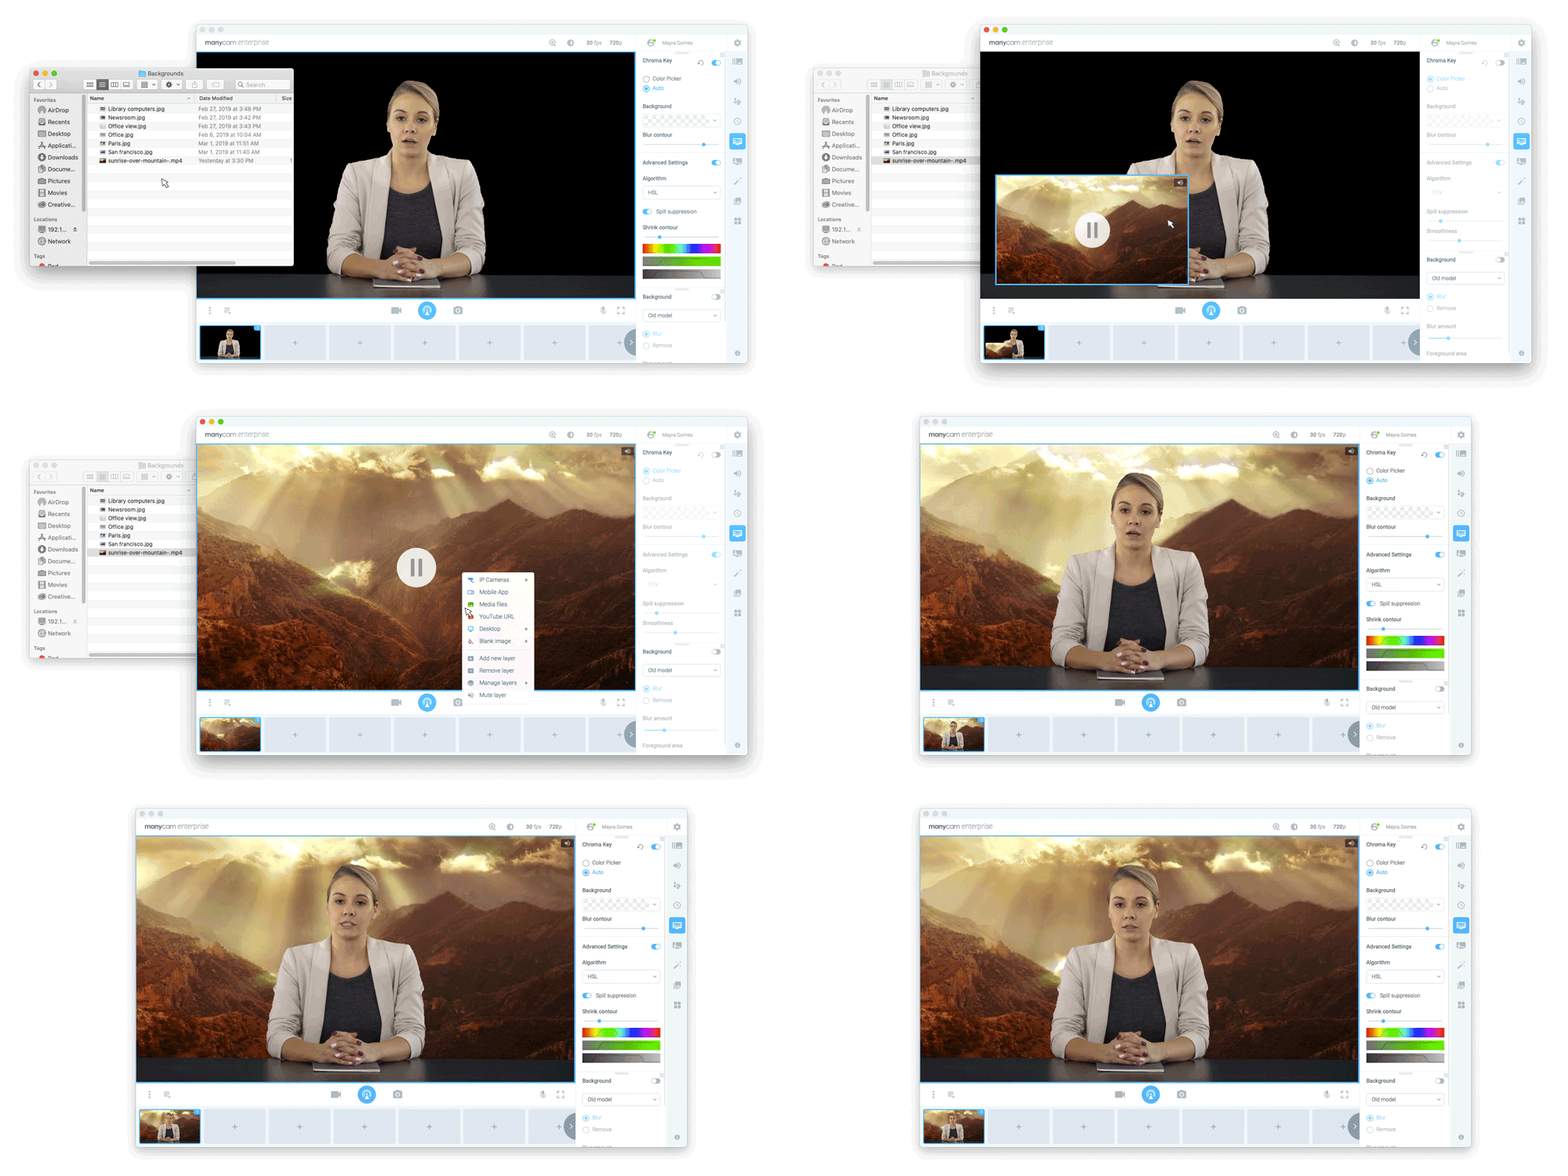
On ManyCam, you can also use the Virtual Backgrounds feature to remove your real backdrop and layer any other video source as a background. For instance, you could get stock footage of a classroom or coffee shop and set it in the back, which gives your virtual background a more realistic look.
Here is how you can do it:
- Once you’ve activated the Virtual Backgrounds feature, click on the dropdown menu to select the image and choose Transparent Background.
- Next, right-click on the Live Window and “Add New Layer.”
- Add your video file to the new layer, then right-click on the layer and go to Manage Layer so that you can choose “Fit to Screen.”
- Lastly, right-click again and on Manage Layer, click on “Send to back.”
Just like that, your video will become your virtual background during your live videos.
Final Thoughts
With the Virtual Backgrounds feature, users can get creative with their backgrounds during video conferences, live streams, and chats. You can choose to create virtual backgrounds with the design tools mentioned above, stock images, or outsource designers, as well as play around with the layers and video sources. Either way, your virtual backgrounds will be uniquely yours.
What virtual background are you going to create for your meetings or broadcasts?
Download ManyCam for free today!


