NDI might be the versatile solution you’ve been waiting for to take your live streams, webinars, and video conferences to the next level! So here is your Ultimate NDI Guide!
With NDI, you can supply video sources through your network as if they were locally connected to your system. This means you can enjoy independence from cumbersome hardware and focus on your content delivery during live streams, webinars, video conferences, and more. This article is the ultimate NDI guide to help you understand what NDI is, how it works, and how you can benefit from it using ManyCam.
Want to use NDI sources on live streams and video calls? Download ManyCam for free today!
Introduction to NDI
NDI® – which stands for Network Device Interface – was initially created in 2015 by Andrew Cross (chief architect of NewTech), seeking a new way to send video feeds between different scenarios. There was a need to get away from traditional HDMI and SDI cabling and its limitations – cabling distance, resolution, cost, lack of flexibility.
The most common uses of NDI are to send and receive video over IP and control NDI cameras over the same single ethernet cable used to send audio and video.
Since being created, it has changed the game in so many ways, from turning a smartphone into an A to D video input to a broadcast production switcher to having PTZ NDI cameras that are discoverable and controllable over a LAN to software and hardware with seamless integration.
What is NDI?
To sum it up, NDI is an open protocol for streaming video over IP networks such as LANs and WANs in high quality and low latency. Therefore, you can think about it as an easy way to connect video between computers over a LAN (a local area network).
As it has gotten more powerful, NDI connections – originally adopted by live video production software such as ManyCam – are available these days in various video apps. It’s being used by industries like broadcasting, education (distance learning), live events, to name a few.
Today, it has many software and hardware integrations, as it’s easy to use for any project on almost any computer (e.g., Windows, macOS, and more).
It is built to be deployed, in most cases, on a standard off-the-shelf 1G network, which is familiar to most.
The advantages of NDI
There was a time when many different cables were needed for just a single camera connection to a live production switcher. You needed to send video and camera control for shading, as well as send audio and combine everything. All these specific cables had one purpose: send a signal in one direction.
NDI requires zero configuration, and although it was created over 6 years ago, we still see brand new workflows and technology happening because of how powerful the IP is.
It has created a simple and easy way (and free in most cases) to connect video over your network, so it’s been very exciting for video producers in all fields.
How does NDI work?
It requires some networking infrastructure, which you probably already have. You can also pick up a standard networking router with built-in wifi, or network switch, which you can easily find, and are very affordable.
Together, you can create fantastic video production systems with multiple computers working together. Essentially – and very affordably – you can use ethernet cabling and standard off-the-shelf networking equipment to replace super expensive video routing gear.
You should note that there is something called NDI tools, freely available at NDI.tv to immediately set up an NDI and connect it over a LAN. In general, it’s straightforward and easy to use. But, it has a lot more power the more in-depth you go.
When you connect an NDI-enabled camera to a network, it will identify itself. On that same network, there will be an NDI-enabled device that can receive that signal, for example, ManyCam. You simply select that NDI camera source, and you can now view and utilize that source.
This essentially makes any ethernet port in your studio, office or campus, a potential camera location. Because it uses a network for that communication, one cable can be used for more than just sending one signal.
It can send data, such as CTL for a PTZ camera, tally to indicate status, return audio, video, and so much more.
3 important things you should know going in are that:
- Live production requires minimum latency, so there are some network requirements to follow. For now, just remember a 1 GB network infrastructure is required.
- This is just a single camera solution (imagine a studio in one part of the facility). With NDI, any part of the office can become part of your live production. Different teams in a company can simultaneously stream videos from their office area, and these are just some of the possibilities.
- Some computers may not be fast enough to run NDI. There can arise bandwidth and hardware processing limitations. The good news is, most computers these days are, indeed, fast enough to use. If you have a computer that has an i5 or faster processor, you can use that NDI on that computer, meaning you can use your computer to send and receive video.
How to use NDI on ManyCam?
Lastly on our NDI guide is how you can apply this technology on ManyCam. Ever since ManyCam 7.4 for windows, and 7.3 for mac, we’ve introduced NDI input and output.
One of the most popular ways to NDI with ManyCam is to have guests join your broadcast in conjunction with Skype.
To get started using Skype as an NDI source within ManyCam, you first have to enable it within Skype. To do so: open Skype settings → calling → advanced → “enable NDI usage.”
Now all you have to do is start a Skype call, right-click on the main video preview, go to “NDI input,” and select the speaker you want to see.
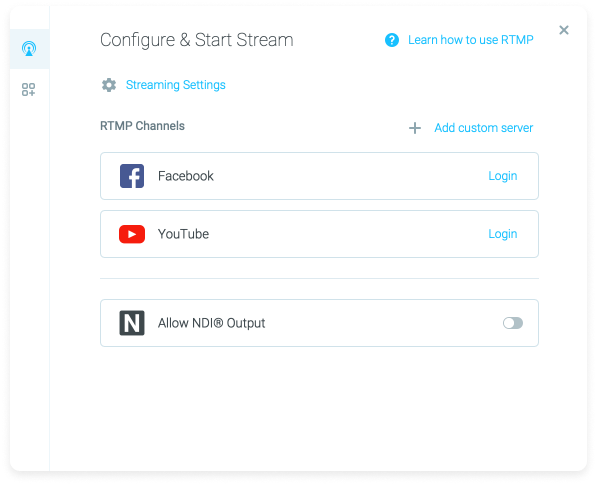
ManyCam also supports NDI output. All you need to do is return to ManyCam, click the live streaming button, then enable NDI output. Once enabled, ManyCam will be visible to other NDI compatible video products as a video feed.
To test that the feed is working correctly, use your webcam as a video source within ManyCam, then use the NDI studio monitor. To do so, click on the bar at the upper left corner, select “workstation,” then you can see ManyCam NDI as a video source.
NDI Guide – Final Thoughts
Though it can be a bit tricky to wrap your head around at first, once you understand what it is and how it works, NDI can present limitless video production possibilities to you and your team.
We hope you found this NDI guide helpful and that you’re ready to explore new possibilities with your live videos and web conferences.
Make sure you download the latest version of ManyCam and give this a try!