Live streaming videos are an amazing tool to grow your online presence and expand your audience, but its technicalities can be daunting. Many things can go wrong during a live video, such as quality issues, lagging, equipment malfunction, sound difficulties, and the list goes on. With these actionable tips below, you will be able to improve your live streaming quality or, at least, mitigate possible streaming issues that could occur.
If you’ve never tried going live before, these tips can help you understand the technical aspects of broadcasting and overcome your fear of live streaming. Even if you are already a live streaming pro, you’ll find advanced streaming setting tips that can help you tweak your stream and improve your live streaming quality.
Want to enhance your live streams? Get the right live video tools with ManyCam!
What do you need to achieve high-quality live streaming?
Before we go into the actionable tips to improve your live streaming quality, it’s crucial to understand the fundamentals of live streaming. To oversimplify things, live broadcasts have two main components, an internet connection, and live streaming equipment.
As far as the internet connection goes, when it comes to live video, the most important thing is your internet upload speed. It determines how much information your provider can send online per second (Mbps – megabits per second). So, the higher it is, the better.
Equipment includes your hardware, from your computer to all the gear you might need, such as cameras or microphones. With live broadcasts, your computer’s power has a massive impact on the results. Here, it’s also vital to include software applications and platforms that make it possible for you to go live.
Your internet speed, computer power, and settings will determine the quality of your live stream. So, how can you make the most out of what you have?
11 actionable tips to improve your live streaming quality
Tip 1 – Check upload speed
The upload speed needed for your live broadcast will vary depending on the quality you’re trying to output. When a video has higher quality, it means you need to upload more information, so you need more Mbps.
Also, keep in mind that your upload speed changes depending on the time, usage, and bandwidth allocation. You can go to Speedtest to test your upload speed.
For a good quality stream, you should have:
- 6 Mbps for 720p
- 13 Mbps for 1080p
The results might vary for each streamer.
Tip 2 – Use Ethernet cable
If you want to improve your live streaming quality, use an Ethernet cable connection instead of Wi-Fi, as Wi-Fi connections can be unstable, which will affect your results. If you have access to a cable connection, you’ll have more stability, and your stream quality will increase.
That being said, you can still go live on a Wi-Fi connection and have a quality broadcast if:
- There aren’t too many people using it at the same time
- The upload speed is high,
- You do a dry run to test different video resolutions
Tip 3 – Try going live at different times of day
The time of day and day of the week can influence the quality of your internet connection and therefore, impact your live stream quality. Each region has its live streaming peak hours, which you might be able to find online. Otherwise, it’s a good idea to try going live at different times of day and weekdays to evaluate when you get the best quality stream.
Tip 4 – Limit the ongoing tasks
Computers always have many different applications running on the background. Though some might be relevant to your stream, chances are, you can find some apps that are just taking up your CPU for nothing. Before your live stream, make sure you close all the software applications that you won’t use during the broadcast. For example, Skype, browsers, Outlook, and so on.
Tip 5 – Disable other connections
To further optimize your computer, you can also disable connections that aren’t necessary for your live stream. If you are connected via Ethernet cable, you can disconnect the Wi-Fi. If you see any other useless connections, make sure you disable them.
Once you have optimized your computer and internet connection to the best of your abilities, plus stopped any irrelevant tasks, it’s time to focus on your live streaming settings.
Tweak your live streaming settings to enhance your live video quality
Tip 6 – Video quality vs. Stream quality
When we talk about improving live streams, it might come down to choosing between higher video quality or better stream quality. A lower quality video has less information to transmit to your viewers, which takes up fewer resources and loads faster.
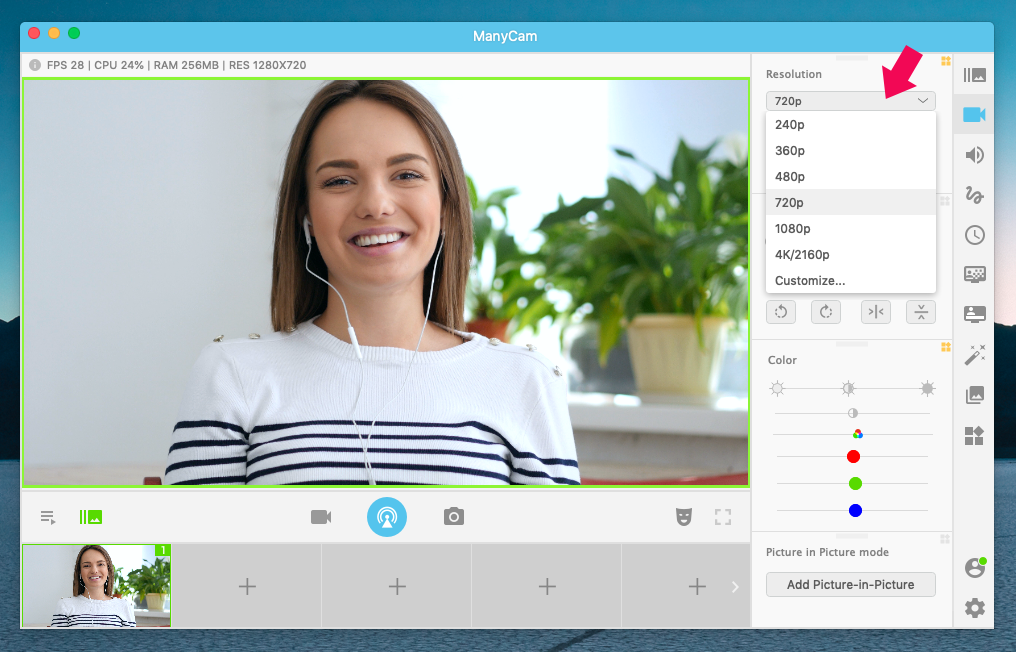
If your live video is laggy, the first adjustment you can do is lower its resolution. For instance, instead of broadcasting it in 1080p, try going for 720p.
Here is how you can do that on ManyCam:
Tip 7 – Adjust the video bitrate
Another critical adjustment that can help you improve your live streaming quality is changing the bitrate. Whether you use ManyCam or another live streaming software application, you should have the option to adjust your video bitrate. It controls how much information is transmitted per second.
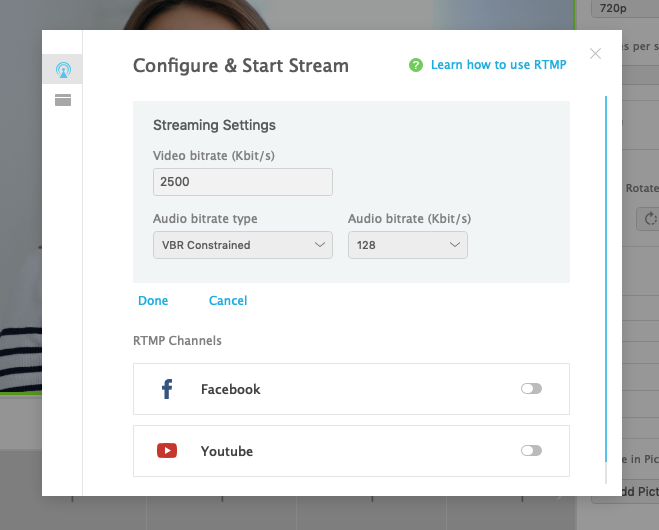
When you lower the video resolution (tip #6), you can also lower your video bitrate because you have less information to transmit. With a 720p broadcast, you could reduce your video bitrate to 3000, or 2500 Kbits. Try playing with a few different variables to see what works best for your resources.
To change your video bitrate on ManyCam, click on the blue broadcast button and:
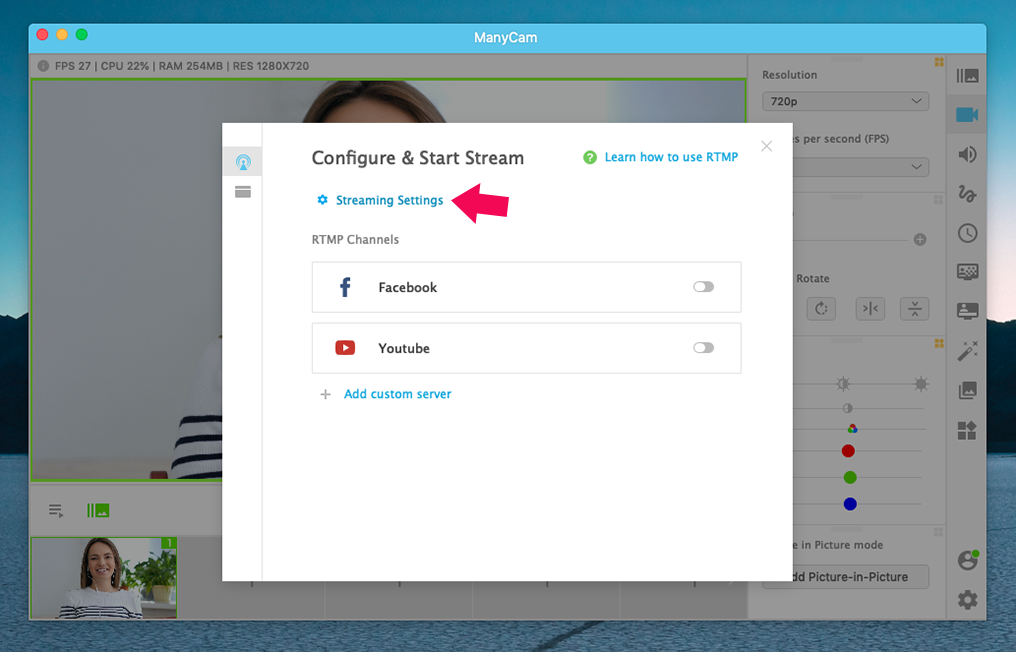
You can also set ManyCam to automatically define the best bitrate settings for your equipment, within Settings:
Tip 8 – Change the FPS (Frames per second)
If your live video is choppy and far from smooth, you can change your FPS rate to try and improve your live streaming quality. This setting determines how many frames or “images” are sent every second. For us to perceive a sequence of images as a moving sequence, AKA video, it has to be at least 24 fps. Less than that and we will be able to see each frame switching to the next.
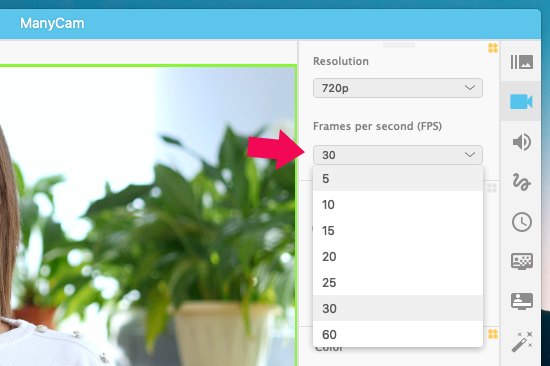
When you set up your live stream, make sure you select above 25 FPS. A framerate of 30 FPS is ideal and will help you improve your live streaming quality. You can stream at 60 FPS for even higher quality, but it will require more power and upload speed.
On ManyCam, you can easily change the FPS rate in the Video Tab:
Tip 9 – Use an encoder with hardware acceleration
For a live broadcast to be engaging and dynamic, you’ll need more than your webcam view. Professional live streamers use multiple video sources, such as screencasting, cameras with different points of view, apps, and much more. Each resource increases the load on your computer and could slow it down.
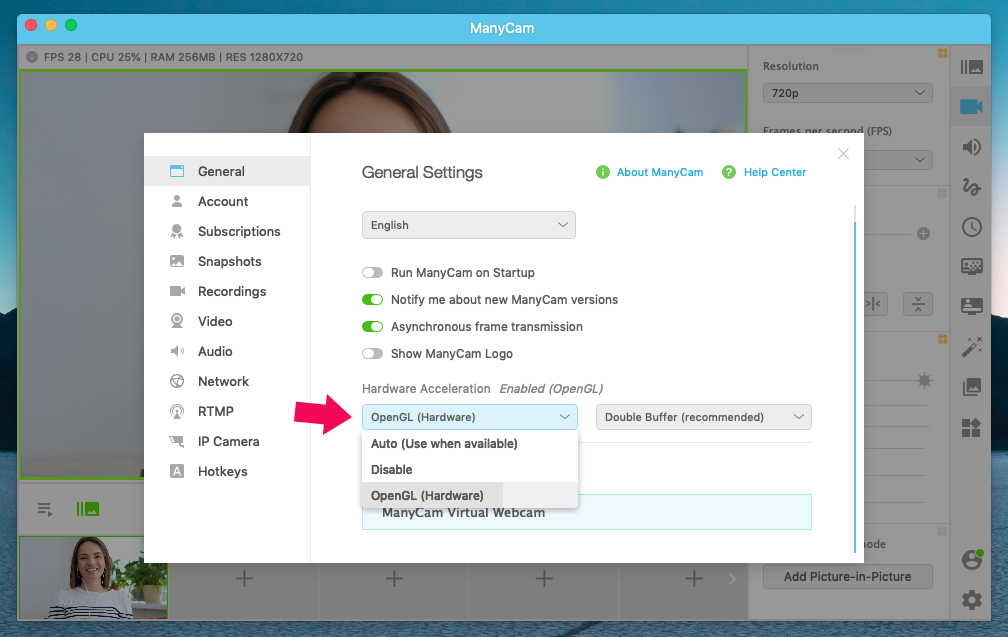
On ManyCam, if you choose hardware as your encoder, you’ll save your CPU power and your broadcast will be processed by your GPU.
Tip 10 – Check the guidelines of your live streaming platform
Sometimes, you are live streaming at 1080p, but the platform is outputting your video at 720p, which means, you are wasting your resources for practically no quality improvements at all. For example, Facebook’s suggested guidelines are:
- Recommended max bit rate is 4000 Kbps (4 Mbps).
- Max: 720p (1280 x 720) resolution, at 30 frames per second.
- An I-frame (keyframe) must be sent at least every 2 seconds throughout the stream.
- Titles must have fewer than 255 characters, or the stream will fail.
- H264 encoded video and AAC encoded audio only.
Source: Facebook
Before your live stream, make sure you check out the best live streaming settings for your platform. Adjust your settings accordingly and try to find the sweet spot between minimal lag or buffering and maximum quality.
Tip 11 – Do dry runs to check results
Each of these changes can have a significant impact on your live stream quality, but what works for one person might not work for others. Since resources are different, there’s no one size fits all in live streaming.
The best way to find the right settings for you is to test. Live streaming platforms like Facebook allow you to go live in private, which means, you can try all the different settings, stream, and see how it goes.
Once you’ve done a few tests, you can analyze the replays to decide which settings worked best.
Key Takeaway
On live streaming, the highest quality settings aren’t always the best settings for you. Many factors should be taken into account when you set up your live stream, especially your computer power and your internet connection.
Testing various settings is vital to improve your live streaming quality. What works for some might not work for you, which is why you should always run your own tests with different settings as mentioned above and choose the best one for you.
What’s most important to you, video quality or stream quality?
Download ManyCam for free today!
Want to learn more about live streaming?
The Ultimate Guide to Live Streaming Content
Live videos can help you increase your exposure, expand your reach and grow your online audience. So, if you are an entrepreneur, a content creator, a YouTuber, an influencer, an online teacher, a streamer, or you want to grow your online following, start creating live videos… (Continue reading)
Live Streaming Setup 101 – Everything you need to know
In this post, we’ll give you an overview of what you need to set up a live stream. We also talk about the need for different live stream equipment, depending on your live broadcasting goals. Here you will learn more about the live streaming gear available out there and how to structure your live streaming setup… (Continue reading)


