If you want to use multiple media sources, camera angles, and video adjustments on your video calls, you need a virtual camera. Here is how you can use one!
Video calling apps are often limited to a few video features, making your video calls, business presentations, and client meetings uninteresting, to say the least. In addition, it’s hard to keep viewers engaged if all you have is your webcam view and a screen share. That is why you need to use a virtual camera for your remote meetings and video calls.
Virtual cameras can be connected to any video calling or conferencing app, and they give you a multitude of tools to work with on your live videos. A robust virtual camera solution like ManyCam allows you to add multiple camera angles and other media, adjust your video (brightness, color, crop) and create picture-in-picture layers for your presentations.
Want to start using a virtual camera? Download ManyCam for free today!
How to use a virtual camera in video conferences
The idea of a virtual camera is basically connecting a video feed to your video calling app instead of just connecting a webcam. This blog post will show you how to use ManyCam as your virtual camera and connect it to any video conferencing app.
Step 1 – Download ManyCam
You can download ManyCam for free here. Another way to go is to purchase one of the subscription plans so that you have more to play with.
Step 2 – Prepare your video feed
Before connecting your virtual camera to any video call, you will have to set up your video sources. This is where you can get creative and add a lot more interest to your videos.
For instance, you could add picture-in-picture layers with your webcam in a rounded view to the corner and your PowerPoint presentation as your primary scene. Or, many users split their live window view into four and add different resources to each, like webcam view, second camera angle from a mobile, documents, and images.
The possibilities are endless when you can create multiple picture-in-picture layers and various scenes to switch between.
So, on ManyCam, you will add all your video sources and create your scenes. Feel free to check out this video for an in-depth step-by-step on using ManyCam.
Step 3 – Connect to your video conferencing app
On your video conferencing app, there’s a video icon. Usually, that’s where you’d select your webcam or make sure your webcam is connected. Some apps have that control within settings, while others will show it on the main call interface, as Zoom does.
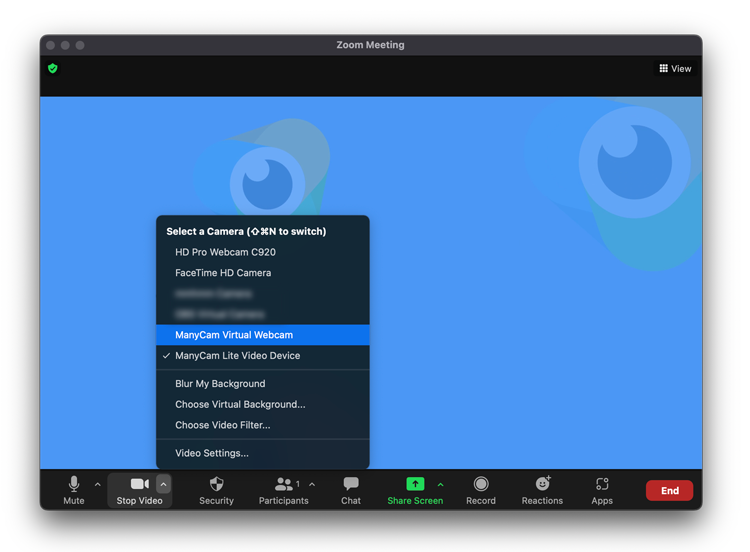
When clicking on the video icon, ManyCam should show up among the options. Select ManyCam and watch your main live window appear in your conferencing app.
It’s as simple as that.
A quick note on audio
You’ll also have to adjust your audio input on the conferencing app if you also have any audio sources connected to ManyCam, such as your microphone, pre-recorded videos, or audio playlists.
Simply click on the microphone icon (or go to audio settings) and select ManyCam as your audio source.
Key Takeaway
Connecting a virtual camera like ManyCam to your video conferences and calls is easier than you think and can help you transform your videos. In just a few steps, you’ll be able to deliver highly engaging business presentations, client demos, and more through your video conferences and calls.
Make sure you download ManyCam today so that you can access all the live video tools you need.
